Category Archives: Research

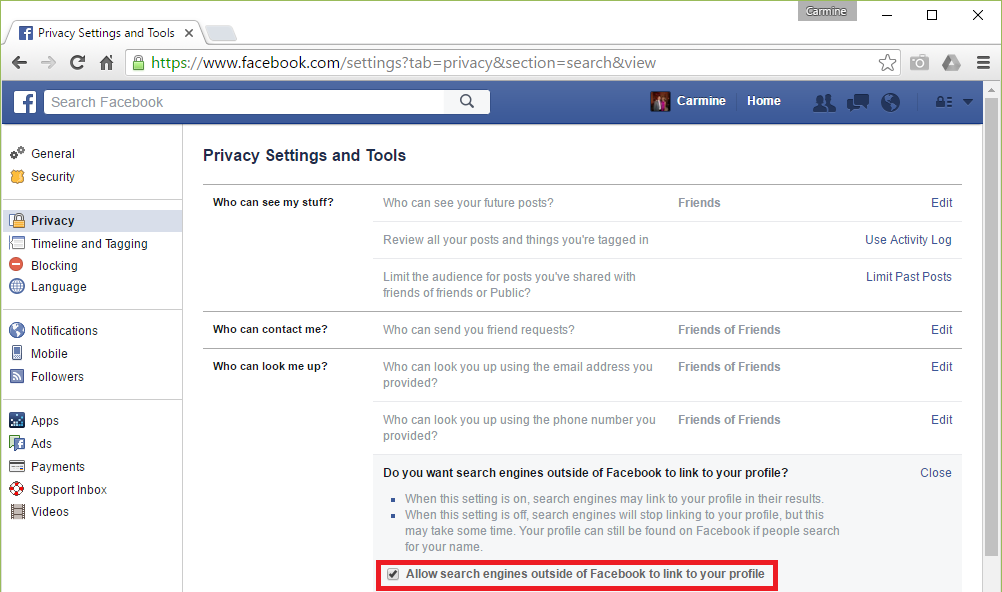
How to setup exchange on Android

1.  Swipe Down from the top of your screen to access the quick settings.

Android 1

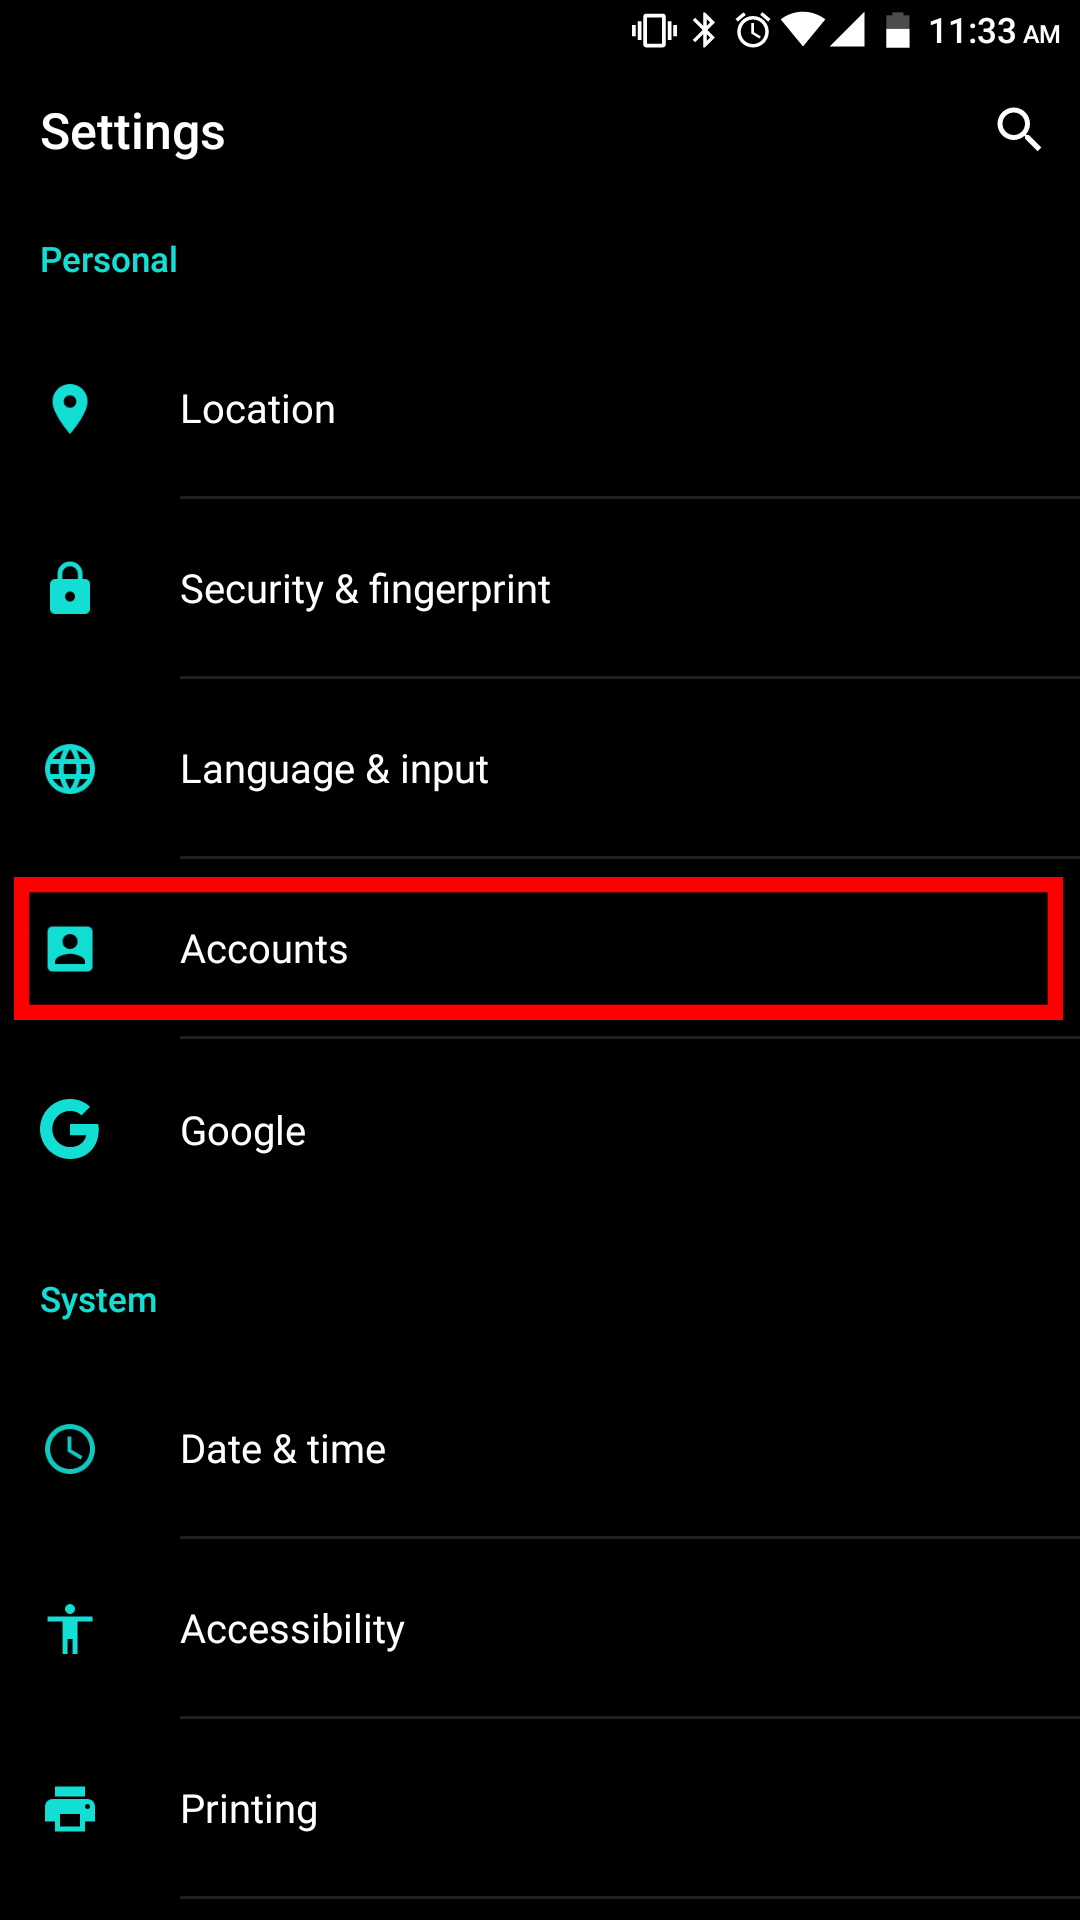
2.  Tap the small gear icon in the top right corner.

Android 2

3.  Scroll down and select “Accounts

Android 3

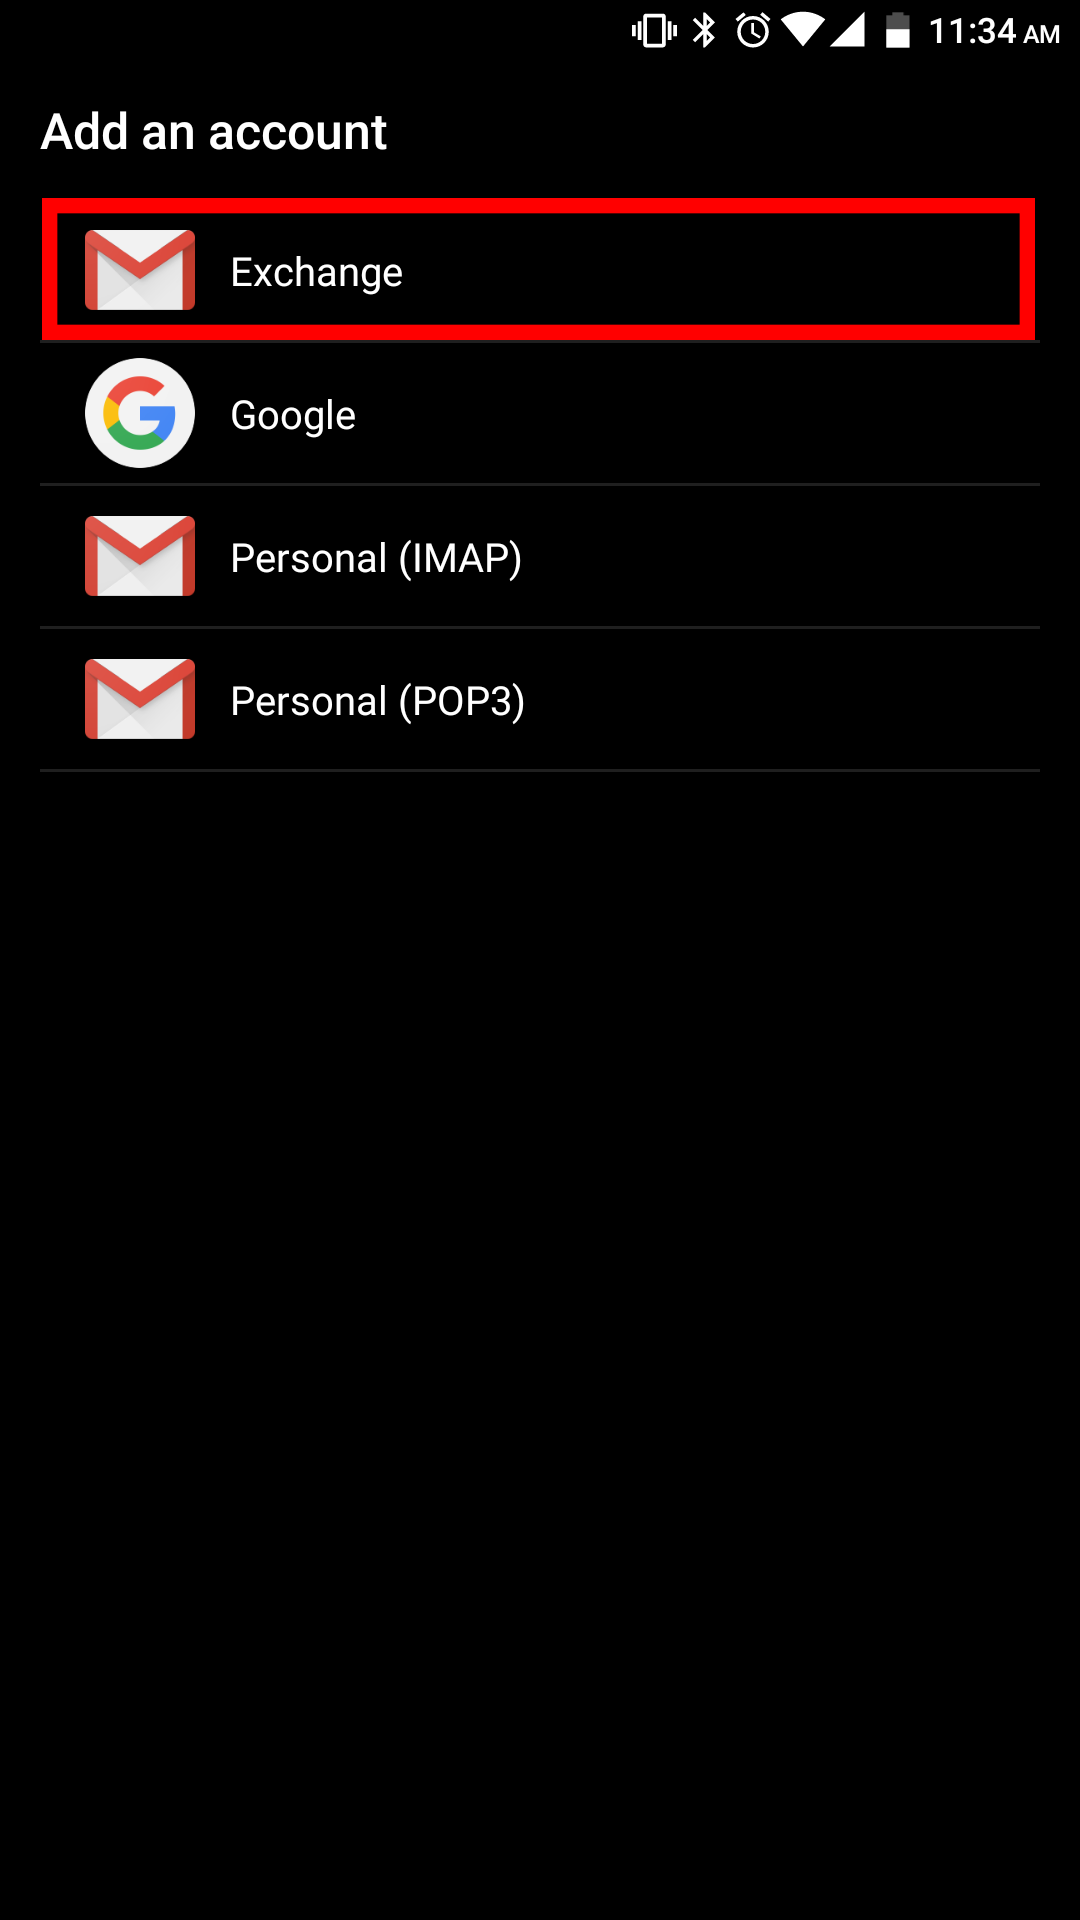
4.  In accounts select Exchange.

Android 5

5.  Next select Manual Setup.

Android 6

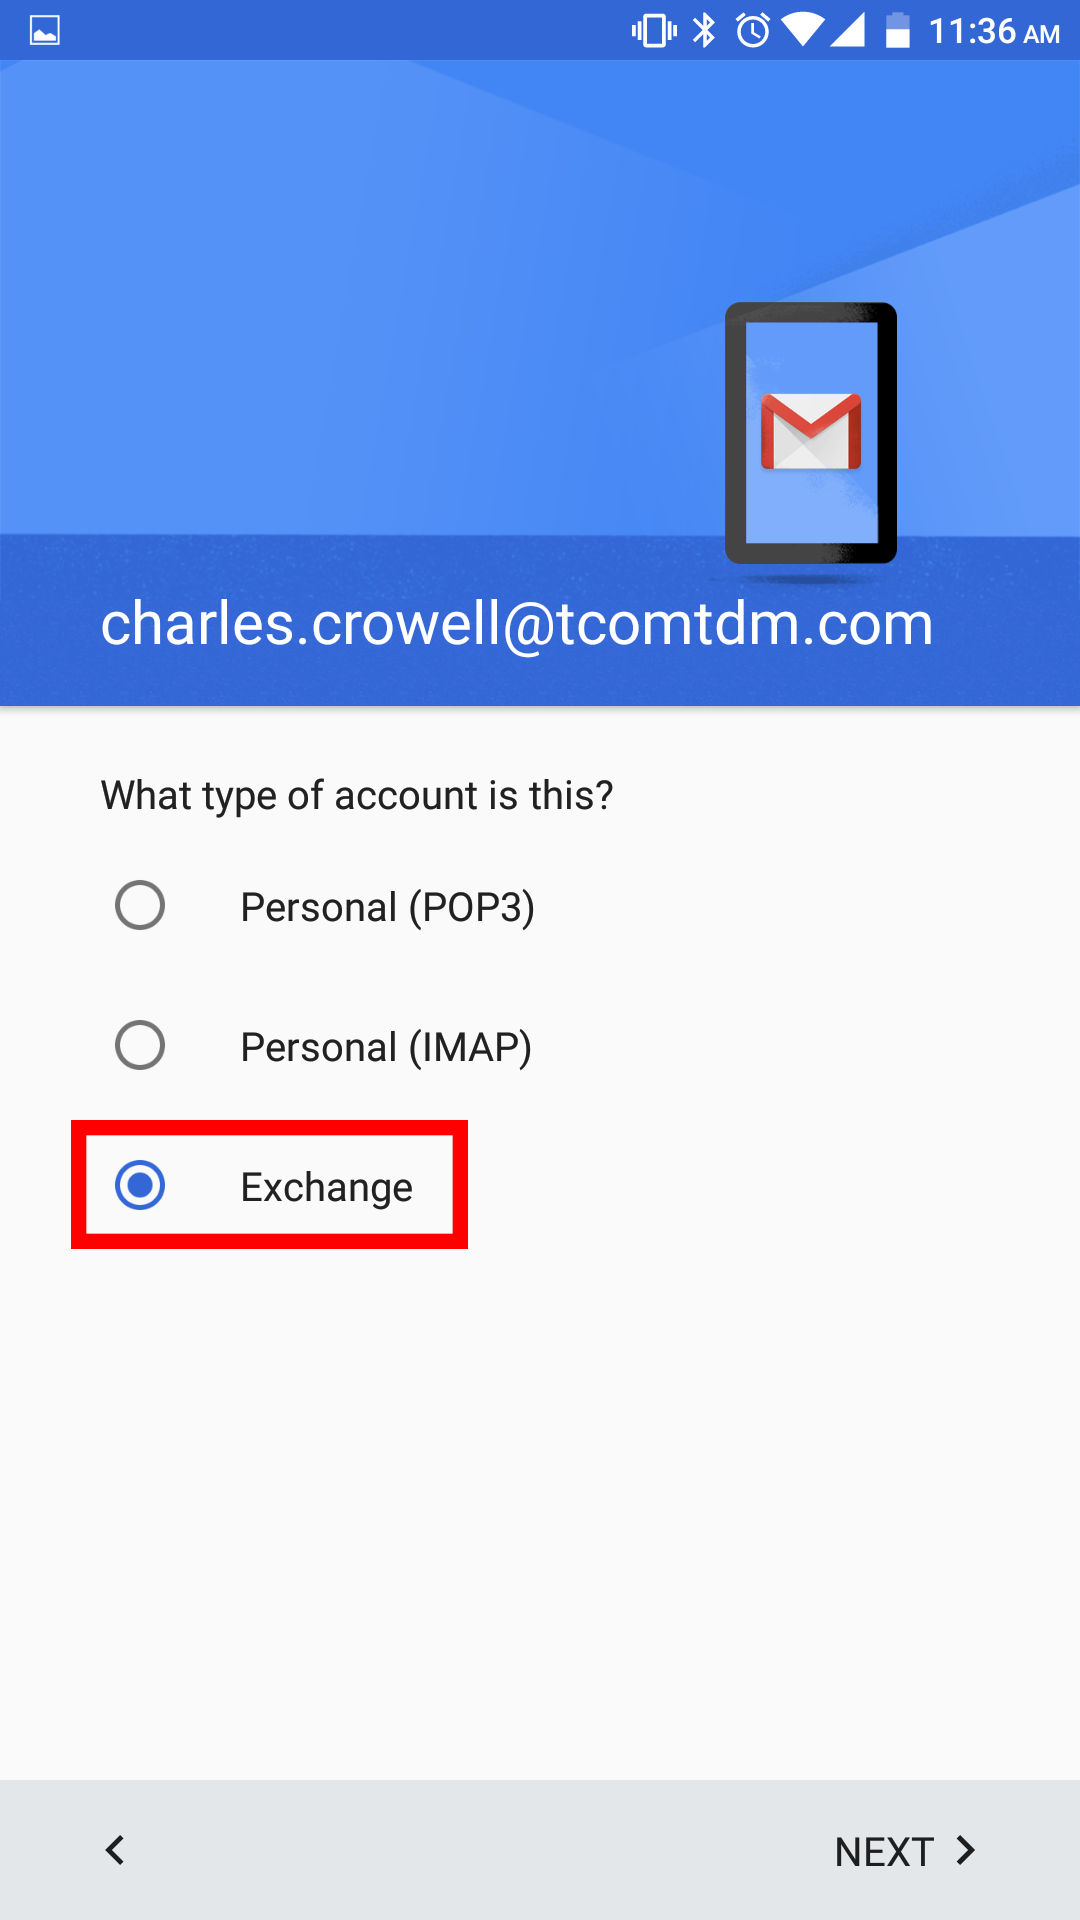
6.  Then select Exchange.

Android 7

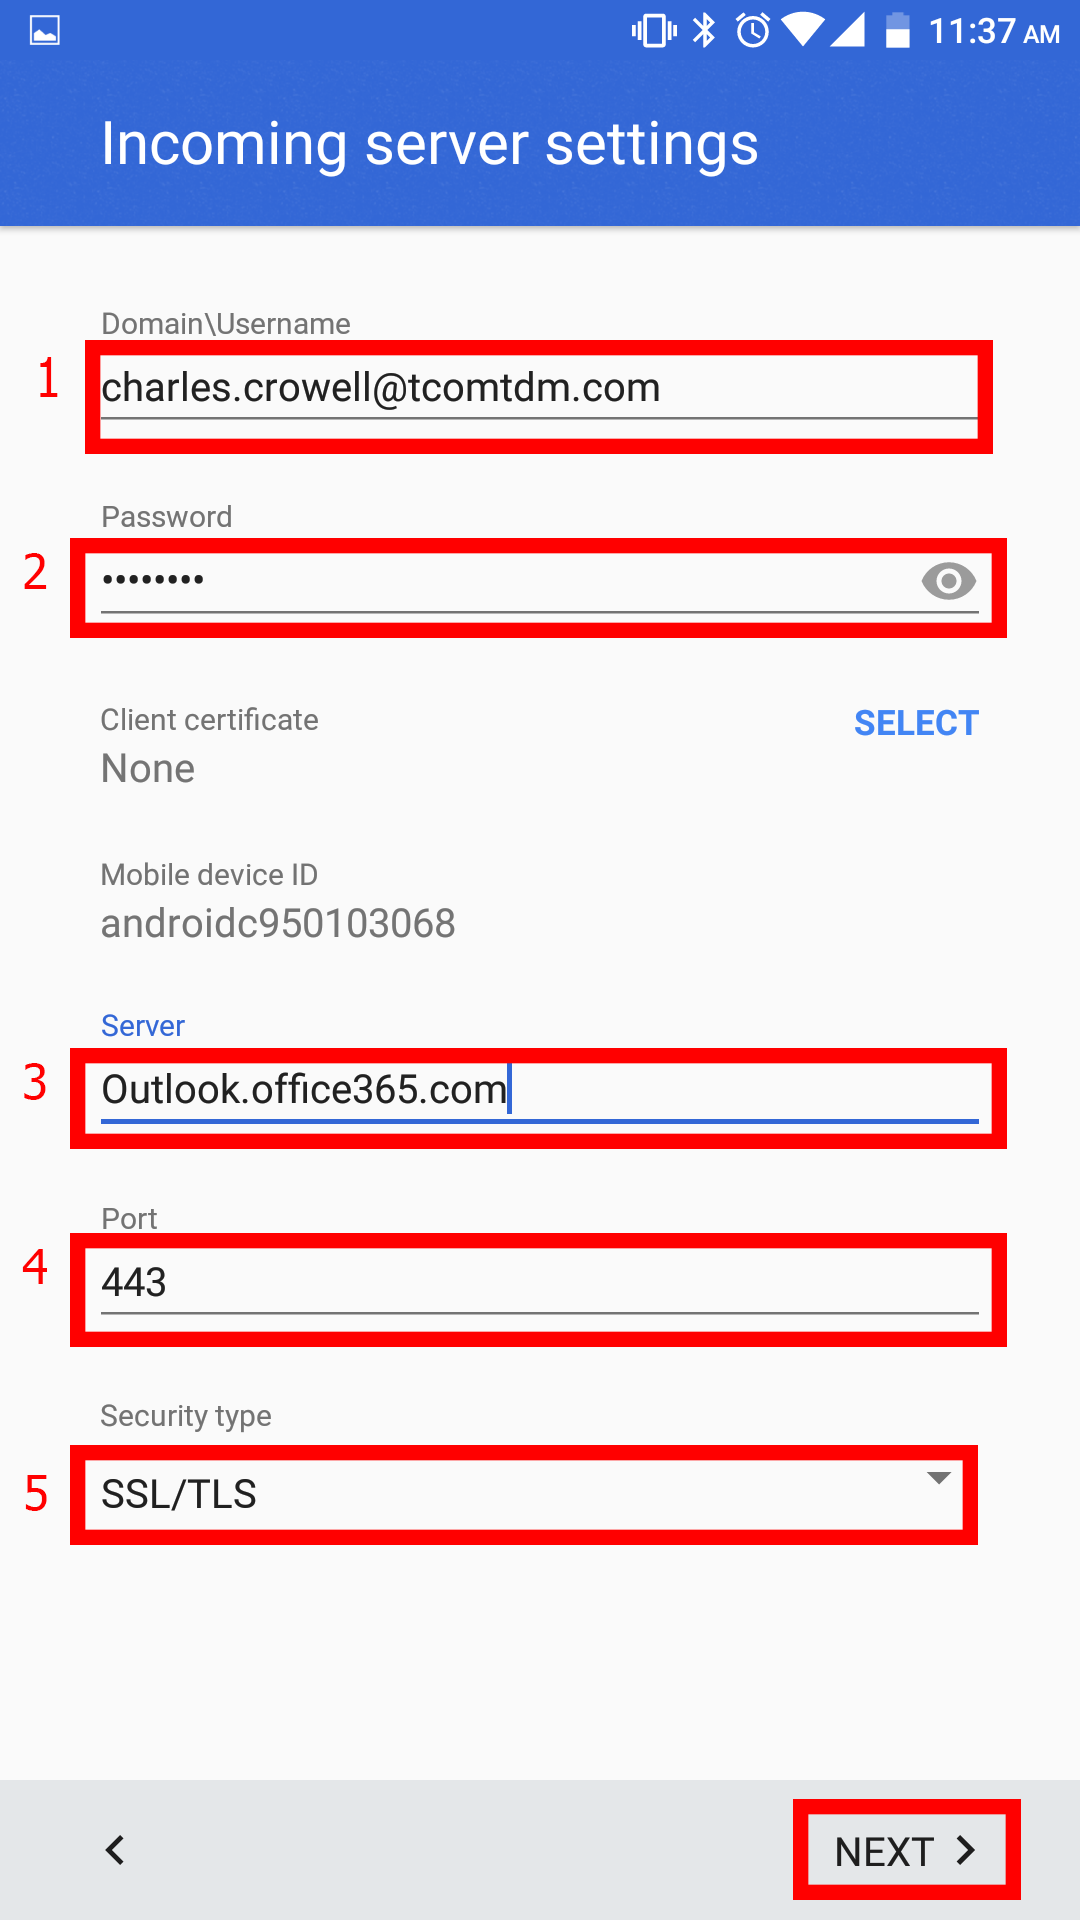
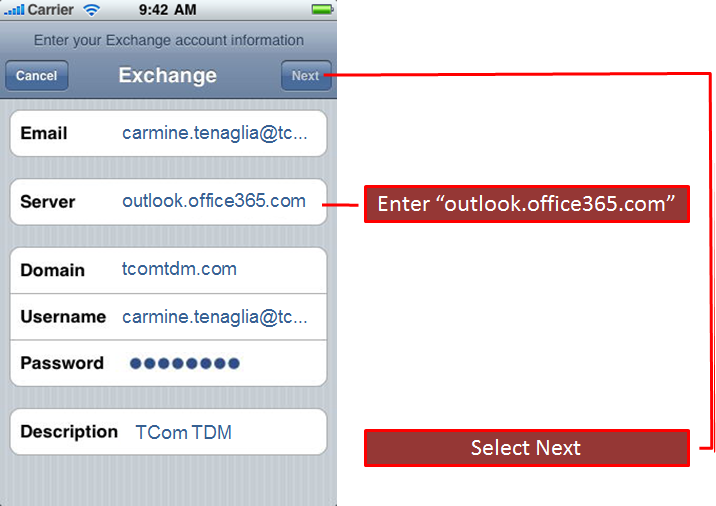
7.  Now fill in the following ordered as on the screen:

1.  Your email address

2.  Your password

3.  Under server, type in Outlook.office365.com

4.  Leave Port as 443 (Change it if it is not)

5.  Leave Security as SSL/TLS (Change it if it is not)

After you have filled everything in, hit “NEXT“.

screenshot_20161024-113756

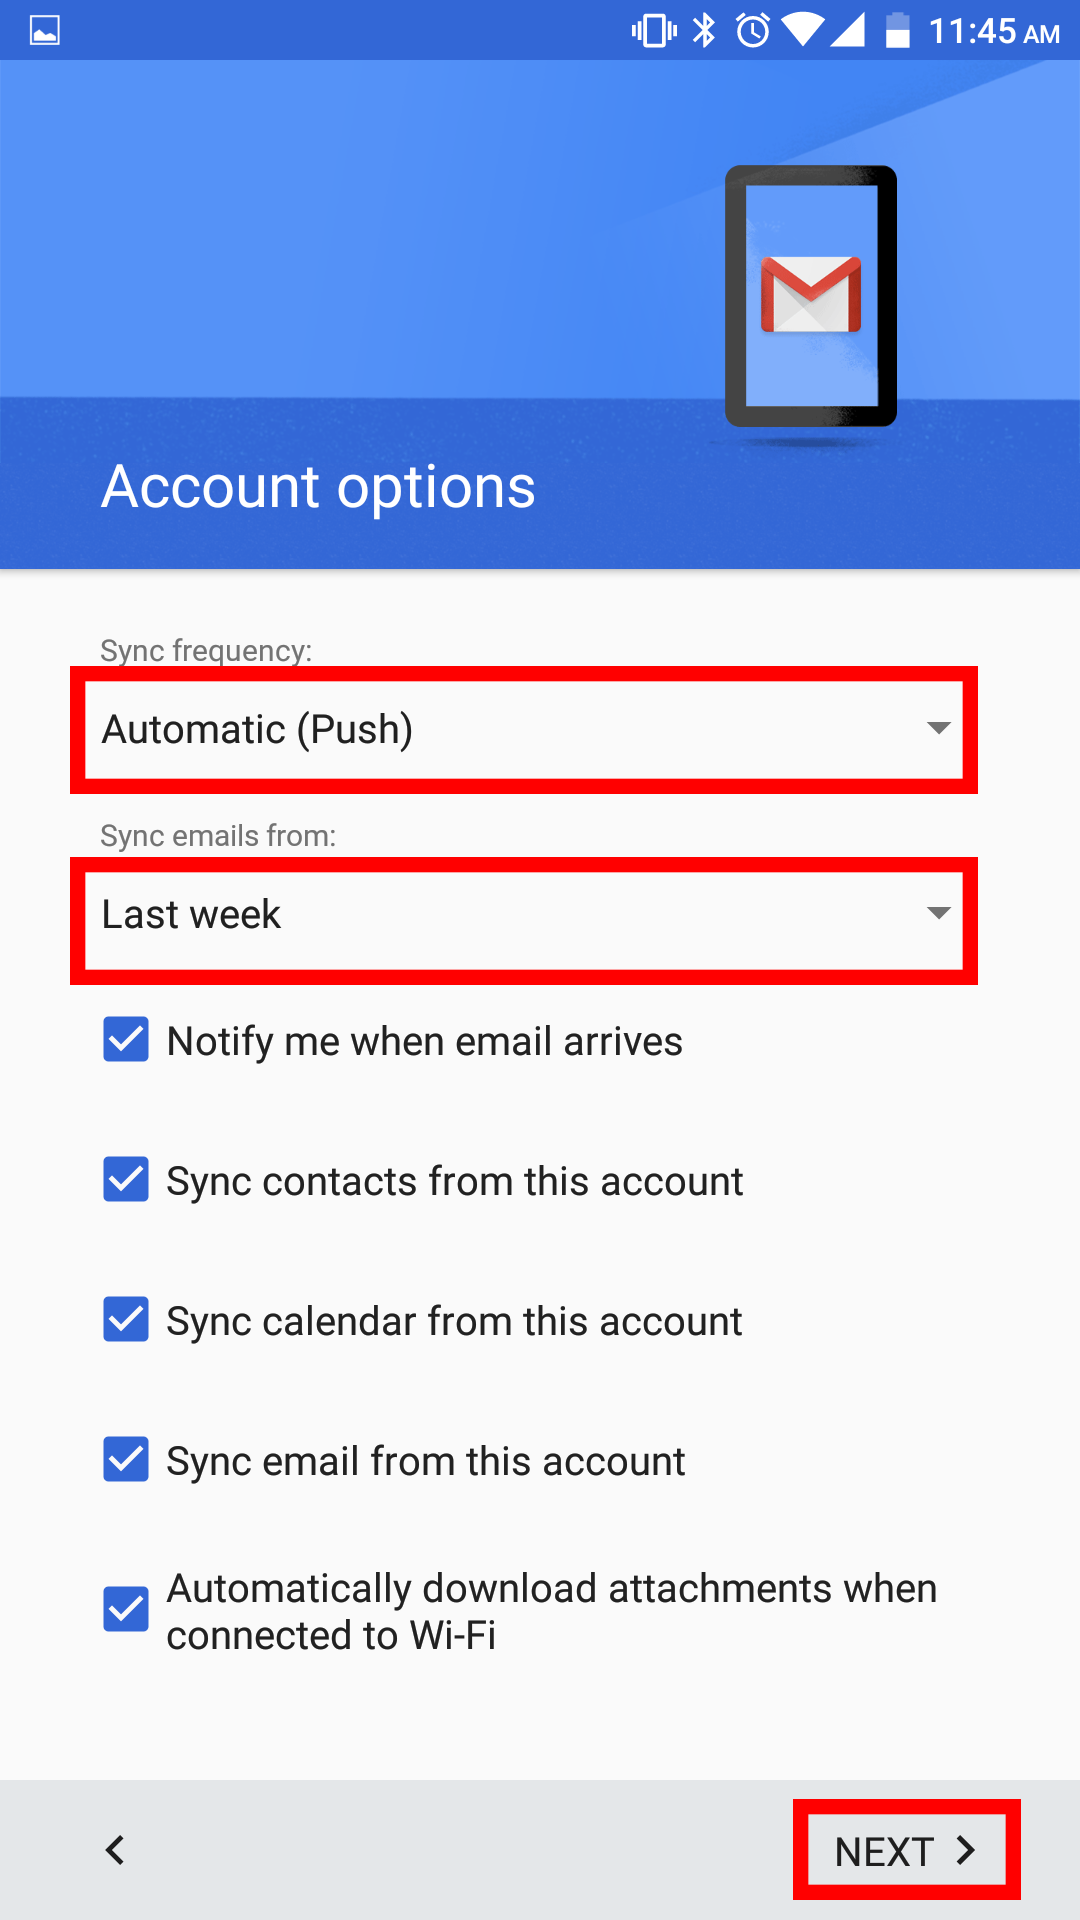
8.  The first box on this screen should be set to/left as Automatic (Push).  It is recommended that you “Sync” Two Weeks of emails to conserve data.  Make sure all boxes on the screen are checked, unless you are instructed otherwise.

Android 9

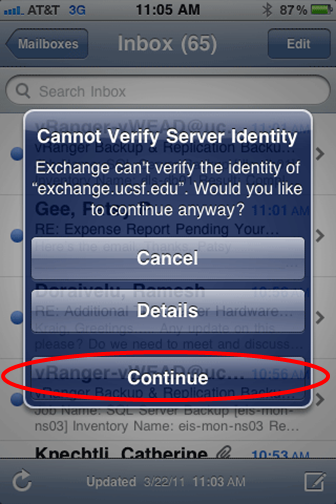
The next step may not apply to you.

9.  In the case that the following shows up on your screen after completion, simply hit activate in the bottom right.

Android 10


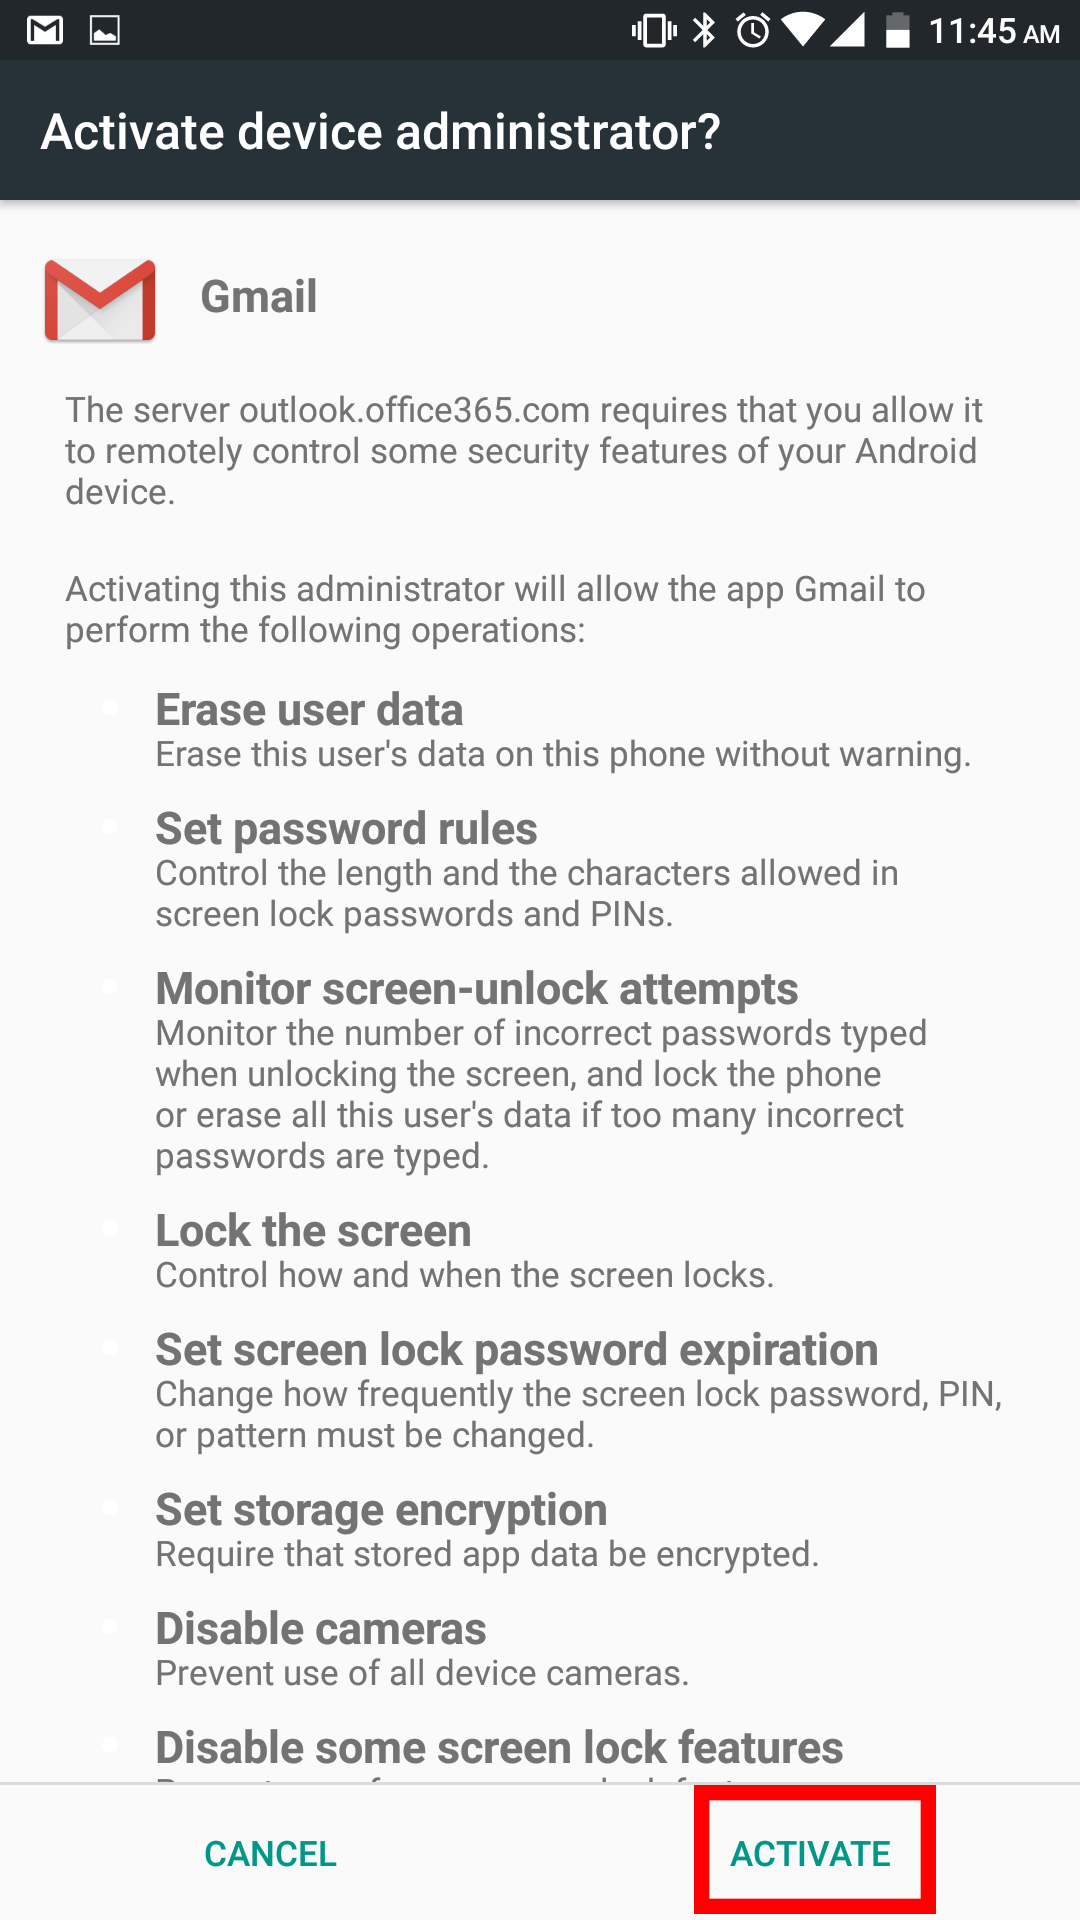
Your account should now be set up.


Setup Office 365 Email on an iPhone

Below is a brief explanation of how you can setup your Office 365 Email on an iPhone.

Open your “Settings” menu and navigate to “Mail Contacts, Calendars”, then select “Add Account”.  For “Account Type”, select “Microsoft Exchange” or “Exchange”.

You will need to enter in the following settings

iPhoneO365-1


If it asks you for a server, enter “outlook.office365.com”.

iPhoneO365-2


You may receive a certificate error, select “continue” to acknowledge.

iPhoneO365-3


Last, select the information you would like to download from your Office 365.  In order to get email, you will need to at least have “Mail” set to “On”.

iPhoneO365-4

How to Make you Facebook Profile Available to Google

My most recent post, “How to Make you LinkedIn Profile Available to Google” lead to a few people asking how to do the same thing on Facebook, and a few even asked how to remove their page from Google, so we will go over both.

Once you are logged into Facebook, Click the “Privacy Icon” in the upper right, then Select “See More Settings”.

Facebook - Home Page

Once In the Privacy Settings and Tools, you can see if your Facebook profile is available to Google by looking at the option for “Do you want search engines outside of Facebook to link to your profile?”

If it is set to “No”, Anyone Googling you will be unable to see your profile.  If it is set to “Yes”, those googling you will be able to see your profile.  To change it, select “Edit”.

Facebook - Privacy Menu

By checking the box, you enable people to find your Facebook profile from Google, if you uncheck the box, if someone Googles your name, your Facebook profile will no longer be available to Google.

This setting may take up to 48 hours to go into effect.

How to Make you LinkedIn Profile Available to Google

Today, I was asked by someone why they were not able to see their LinkedIn profile anymore when they Googled their name. I tried to explain that LinkedIn’s privacy settings have changed since they had last tried to search for them self. I also offered to do a brief write up explaining how to make it available to Google, hopefully this helps some of you as well.

Once you are logged in, click your pictures to open the “Account & Settings” dialog.  From there, click “Privacy & Settings”.

LinkedIn - Home Page

After you have arrived at the “Privacy & Settings” Menu, Click “Privacy”.  From there, Click “Change” next to “Edit your public Profile”.

LinkedIn - Privacy Menu

On the right hand column, you need to select “Make my public profile visible to everyone”.  Then, continue to select the information you want to be available to Google and the Public, such as “Skills”, Headline”, or “Summary”.  The fields you choose will be available to Google to Search as well as anyone to view, you will also see a preview in the left side pane.

LinkedIn - Public Profile


P4P56EA-ABU_2_1750x1285[1]

HP G3 ProBook 450

Specs:

8 GB RAM
i5 Processor
256 GB SSD Hard Drive
15.6″ Display

Pros:

Best price point for a laptop with SSD I have seen. Battery Life is very good, but that is a given without the spinning disks. Very sharp 15.6″ display with the added benefit of the 9-key.

Cons:

May have been rushed out of production, there are at least two driver conflicts: 1) “Intel(R) 100 Series Chipset Family PCI Express Root Port…” all need updates. 2) Video card is still a little buggy. Last major con is the lack of a 5 GHz wireless card, sure the 2.4 GHz card is fine, but I want more.

Summary:

Stock features include Windows 7, 8, or 10 Pro, DVD-R/W, Webcam, Card Reader, 4 USB Ports, VGA port, and an HDMI port. I have had it 3 months and it has run reasonably well. The things that have really hindered this laptop are some VERY BAD driver errors:

1) As soon as you get your Laptop up and running, you need to immediately and painstakingly individually update the drivers for each of the below items with Windows Updates. If you do not, you will find an unbelievable number of cyclically generated errors that “A corrected hardware error has occurred”.

Intel(R) 100 Series Chipset Family LPC Controller/eSPI Controller – 9D48
Intel(R) 100 Series Chipset Family PCI Express Root Port #1 – 9D10
Intel(R) 100 Series Chipset Family PCI Express Root Port #5 – 9D14
Intel(R) 100 Series Chipset Family PCI Express Root Port #6 – 9D15
Intel(R) 100 Series Chipset Family PCI Express Root Port #9 – 9D18
Intel(R) 100 Series Chipset Family PMC – 9D21
Intel(R) 100 Series Chipset Family SMBUS – 9D23
Intel(R) 100 Series Chipset Family Thermal subsystem – 9D31

You will also need to update the BIOS.

2) For reasons unknown, the Laptop will BSOD with a drive error for “Synaptics PS/2 Port TouchPad” (SysTPN.sys). Seems only to occur when I use the track pad, so I try to favor the Wireless Mouse.

3) From time to time, if I have an external monitor attached via the HDMI port, and the screen saver turns on, the HDMI connected monitor will go blank and the video card refuses to acknowledge the Monitor until I restart windows.

Bottom Line:

My last laptop review was for a Sony VIAO which I considered a “Mac-Book-Killer”, this laptop is great for work and play, but it is certainly not the ultimate windows machine. I would recommend it to a friend or colleague, but only if they were relatively computer competent – it has a few bugs that are not hard to work out, but they need someone who understands what to do.

Setting Up Cisco IP PBX

This KB will explorer setting up a Cisco IP PBX for PRI traffic to Phones.

For the purpose of this document, you have a Cisco IP PBX that is separate from your primary router for any number of reasons.  The Cisco IP PBX is not responsible for anything accept DHCP, routing calls, and Storing Voicemail.

You will need two separate VLANs established on your switch, one for DATA traffic (routable outside your local IP Scheme) and a separate VLAN for only voice traffic.  For the sake of this, VLAN 1 is DATA, VLAN 10 is VOICE.

Cisco IP-PBX


hostname R2-PBX
!
boot-start-marker
boot-end-marker
!
card type t1 0 0
!
no aaa new-model
clock timezone Detroit -5 0
network-clock-participate wic 0
network-clock-select 1 T1 0/0/0
!
ip cef
!
ip dhcp excluded-address 10.1.1.1 10.1.1.100
ip dhcp excluded-address 10.1.10.1 10.1.10.100
!
! (It does not matter where you assign your Computer IPs from.
! For the sake of comparison, I assigned them from here.)
ip dhcp pool DATA-1
 network 10.1.1.0 255.255.255.0
 default-router 10.1.1.1
 dns-server 10.1.10.21
!
! (These IPs will only be assigned to Phones)
ip dhcp pool PHONES-1
 network 10.1.10.0 255.255.255.0
 default-router 10.1.10.1
 ! (Option 150 informs the Phone of the 
 ! Cisco Call Manager's IP Address)
 option 150 ip 10.1.10.5
 dns-server 10.1.1.30
!
no ipv6 cef
multilink bundle-name authenticated
!
isdn switch-type primary-ni
!
voice-card 0
 voice-service dsp-reservation 60
!
voice service pots
!
! (This specifies what kind of connections
! are allowed between devices)
voice service voip
 allow-connections h323 to sip
 allow-connections sip to h323
 allow-connections sip to sip
 fax proto t38 vers 0 ls-redund 0 hs-redund 0 fallback none
 sip
!
! (This is what initializes voice services)
voice register global
 ! (This will initialize Cisco Call Manager Express)
 mode cme
 ! (This will set the maximum number of Directory numbers)
 max-dn 400
 max-pool 10
 mwi stutter
 mwi reg-e164
 ! (This is what extension Voicemail will exist on)
 voicemail 9990
 ! (This is the phone's profile serial number)
 create profile sync 0017990697531005
 ! (This command establishes the QoS Tag 
 ! for Voice Traffic)
 ip qos dscp cs1 service
 ! (If you plan on using video calling,
 ! you will need these commands)
 camera
 video
!
license udi pid CISCO2921/K9 sn FTX1731AK84
license accept end user agreement
license boot module c2900 technology-package uck9
hw-module ism 0
!
hw-module pvdm 0/0
!
redundancy
!
controller T1 0/0/0
 cablelength short 110
 pri-group timeslots 1-18,24
!
interface Embedded-Service-Engine0/0
 ip unnumbered GigabitEthernet0/0.1
!
! (Because there are two VLANs, you will need to remove
! any IP Addresses from the Interface)
interface GigabitEthernet0/0
 no ip address
 duplex auto
 speed auto
!
interface GigabitEthernet0/0.1
 ! (Instantiation of VLAN 1)
 encapsulation dot1Q 1 native
 ip address 10.1.1.5 255.255.255.0
!
interface GigabitEthernet0/0.10
 ! (Instantiation of VLAN 1)
 encapsulation dot1Q 10
 ip address 10.1.10.5 255.255.255.0
!
! (This creates the Cisco Unity Express Engine [Voicemail])
interface ISM0/0
 ip unnumbered GigabitEthernet0/0.1
 ! (This is the IP Address of the Voicemail Engine)
 service-module ip address 10.1.10.7 255.255.255.0
 !Application: CUE Running on ISM
 service-module ip default-gateway 10.1.10.5
!
interface ISM0/1
 description Internal switch interface connected to Internal Service Module
 no ip address
!
! (You will need to work with your PRI provider to
! set the specifics for your provider)
interface Serial0/0/0:23
 no ip address
 encapsulation hdlc
 isdn switch-type primary-ni
 isdn incoming-voice voice
!
no ip forward-protocol nd
!
! (If you will have any SIP Running, you will need to
! allow piggybacking)
ip nat piggyback-support sip all-messages router 1
!
ip route 0.0.0.0 0.0.0.0 10.1.10.1
! (This creates your route to the Voicemail Engine)
ip route 10.1.10.7 255.255.255.255 ISM0/0
!
voice-port 0/0/0:23
!
voice-port 0/1/0
!
voice-port 0/1/1
!
!
mgcp
!
mgcp profile default
!
! (Creates the Dialing Plan for outgoing calls)
dial-peer voice 2 pots
 description OUTGOING CALLS
 ! (this creates a dialing plan that calls out when 9
 ! digits are dialed)
 destination-pattern ..........
 clid override rdnis
 ! (The port of your PRI)
 port 0/0/0:23
 forward-digits all
!
! (Creates the Dialing Plan for incoming calls)
dial-peer voice 1 pots
 description INCOMING CALLS
 ! (You will need to work with your PRI provider to
 ! established your "Digits Received".  In this case, 
 ! there are 7 digits received.  The leading "248" is 
 ! appended to the digits so it can route the call to 
 ! the correct DN)
 incoming called-number 248.......
 direct-inward-dial
 ! (The port of your PRI)
 port 0/0/0:23
!
! (Creates the Dialing Plan for voicemail)
dial-peer voice 3 voip
 ! (The first three digits of your Voicemail Ext)
 destination-pattern 999.
 b2bua
 ! (Protocol for communications with your VM)
 session protocol sipv2
 ! (IP Address of your VM System)
 session target ipv4:10.1.10.7
 dtmf-relay sip-notify
 codec g711ulaw
 no vad
!
! (This line will allow for the notification light that
! you have a waiting Voicemail)
sip-ua
 mwi-server ipv4:10.1.10.7 expires 3600 port 5060 transport udp
!
gatekeeper
 shutdown
!
! (This will Create the Phone's Profiles on your Call Manager)
telephony-service
 ! (Maximum number of phones allowed on your System)
 max-ephones 100
 max-dn 200
 ! (IP Address and Port of your Call Manager)
 ip source-address 10.10.10.5 port 2000
 max-redirect 15
 ! (If you will allow Auto Registration of Phones to your
 ! Call manager, here is were it is activated from.  If 
 ! you do not want Auto Registration, remove this)
 auto assign 1 to 10
 auto assign 1 to 100
 calling-number initiator
 ! (You will need to upload your phones Template to your
 ! Call manager and register it here)
 load 8941 11NOV15
 ! (The extension of the Voicemail system)
 voicemail 9990
 max-conferences 10 gain -6
 ! (Creates a web portal for the Management of your phones)
 web admin system name *USERNAME* secret *PASSWORD*
 dn-webedit
 time-webedit
 transfer-system full-consult
 directory last-name-first
 create cnf-files version-stamp Jan 01 2002 00:00:00
!
! (Creates the Directory Numbers for Phones)
ephone-dn 1 dual-line
 ! (This is the Primary number to this Office and
 ! the operators Extension)
 number 2485551000 secondary 0
 label Main Line
 name Main Line
 ! (If busy, forward to Voicemail)
 call-forward busy 9990
 ! (If no one answers in 10 Seconds, forward to Voicemail)
 call-forward noan 9990 timeout 10
!
ephone-dn 2 dual-line
 ! (The number is the Primary Number, the Seconday is 
 ! The user's internal Extension)
 number 2485551002 secondary 1002
 label Operations
 name Operations
 call-forward busy 9990
 call-forward noan 9990 timeout 10
!
ephone-dn 3 dual-line
 number 2485551003 secondary 1003
 label Accounting
 name Accounting
 call-forward busy 9990
 call-forward noan 9990 timeout 10
!
ephone-dn 4 dual-line
 number 3135551004 secondary 1004
 label Mail Room
 name Mail Room
 call-forward busy 9990
 call-forward noan 9990 timeout 10
!
! (This is the DN for Voicemail)
ephone-dn 90
 mailbox-selection last-redirect-num
 number 9990
!
! (Allows VM to inform Phones they have a VM waiting)
ephone-dn 91
 number 9991
 mwi-type both
 mwi on-off
!
! (Allows VM to inform Phones they have NO VM waiting)
ephone-dn 92
 number 9992
 mwi off
!
! (Allows Paging of Phones)
ephone-dn 98
 number 4499 no-reg primary
 name Page All
 ! (This is a random Broadcast IP that the phones
 ! will listen on for Paging)
 paging ip 239.10.10.5 port 2000
!
! (This puts in place the Auto Attendant using the
! Voicemail system)
ephone-dn 99
 number 9999
 name Auto Attendant
!
! (This creates the profile for a Phones)
ephone 1
 description Operations
 ! (This allows video calling on this Phone)
 video
 ! (MAC of Phone for authentication)
 mac-address 20BB.0000.0000
 ! (The phones Paging group)
 paging-dn 98
 ! (Type of Phone)
 type 8941
 ! (Allows for VM Notifications)
 mwi-line 1
 keep-conference local-only
 ! (Buttons: the first number tells the phone what line
 ! we will be specifying for, the second number is the DN
 ! of the Line) Example - Ext 1:DN 3, Ext 2:DN 1
 ! (You can use ":" for normal ring, "s" for silent ring, etc)
 button 1:2 2:1
!
ephone 2
 video
 mac-address 20BB.0000.0000
 paging-dn 98
 type 8941
 keep-conference local-only
 button 1:3 2:1
!
ephone 3
 video
 mac-address 20BB.0000.0000
 paging-dn 98
 type 8941
 keep-conference local-only
 button 1:4
!
end


Questions?  Leave a comment.

Creating a GRE Tunnel with IPSEC

For the purpose of this KB Article, there will be three Sites with the Public IP Address 172.16.25.2, 172.16.86.2, and 172.16.140.2, they will be behind ISP routers.

Lets site you are a nationwide organization with a Headquarters in Rochester MI.  You have a site in Jacksonville, NC and a site in San Diego, CA – you need to establish a basic VPN with these sites using just a Cisco Router – Lets go over the fundamentals.

On each router you have clients behind GE 0/0, your public facing (WAN) port is GE 0/1, and your Network has NAT in place.

Slide1

Ultimately, you will need one router, the one at your HQ/Data-center to act as the HUB router, and the rest of the routers in the VPN will act as spokes.

Slide2

Lets take a Look at the Running Config:


HUB ROUTER (R1)


hostname R1
!
! (Specifies the Diffie-Hellman group identifier)
crypto isakmp policy 1
 hash md5
 authentication pre-share
 group 2
!
! (Specifies the Key that will be used and the 
! addresses that will be allowed to connect to it.
! In this case 0.0.0.0 was used to allow any 
! device to attempt connection.)
crypto isakmp key 123456789 address 0.0.0.0
!
!(Allows recovery of out of Sync SA)
crypto isakmp invalid-spi-recovery
!
! (Specifies acceptable protocols)
crypto ipsec transform-set THEVPN esp-des esp-md5-hmac
 mode tunnel
!
! (Creates map of peers the IPSec can be 
! preformed with. The Peers will need to be
! modified with your "SPOKE" router's public IP)
crypto map VPN1 1 ipsec-isakmp
 set peer 172.16.86.2
 set peer 172.16.140.2
 set transform-set THEVPN 
 set pfs group2
 match address 110
!
! (This is the instantiation of your tunnel interface)
interface Tunnel0
 description Multipoint Primary
 ip address 10.0.0.1 255.255.255.0
 no ip redirects
 no ip split-horizon eigrp 1
 ! (NAT is required)
 ip nat inside
 ! (The Authentication is confirming the 
 ! Identity of other spoke routers)
 ip nhrp authentication SeCrEtKeY
 ip nhrp map multicast dynamic
 ip nhrp network-id 1
 ip nhrp holdtime 600
 no ip virtual-reassembly in
 ! (This is the outside facing source of
 ! the tunnel)
 tunnel source GigabitEthernet0/1
 ! (This is the Tunnel type)
 tunnel mode gre multipoint
!
!
interface GigabitEthernet0/0
 description LAN
 ip address 10.1.1.1 255.255.255.0
 no ip route-cache
 ip access-group 115 in
 ip nat inside
 duplex auto
 speed auto
 no cdp enable
!
interface GigabitEthernet0/1
 description WAN
 ip address 172.16.25.2 255.255.255.248
 ip nbar protocol-discovery
 ip nat outside
 ip virtual-reassembly in
 duplex auto
 speed auto
 no cdp enable
 ! (This is what creates the IPSec Tunnel)
 crypto map VPN1
!
ip forward-protocol nd
!
! (You may have your NAT setup diffently, it 
! should not affect how your tunnel operates)
ip nat inside source route-map PRI-WAN int GigabitrE 0/1 over
ip route profile
ip route 0.0.0.0 0.0.0.0 172.16.25.1
! (This is where you will route your traffic to other
! sites from.)
ip route 10.2.0.0 255.255.0.0 10.0.0.2
ip route 10.3.0.0 255.255.0.0 10.0.0.3
!
route-map PRI-WAN permit 10
 match ip address 100
 match interface GigabitEthernet0/1
!
access-list 100 permit ip 10.1.1.0 0.0.0.255 any
! (You will need the first address to be your local WAN
! IP Address, the second address is the spoke router. 
! This is important because it limits what hosts can attempt
! GRE connections with your site)
access-list 110 permit gre host 172.16.25.2 host 172.16.86.2
access-list 110 permit gre host 172.16.25.2 host 172.16.140.2
access-list 115 permit ip any any
access-list 115 deny ip any any
!
end


SPOKE ROUTER (R2)

hostname R1
!
crypto isakmp policy 1
 hash md5
 authentication pre-share
 group 2
!
crypto isakmp key 123456789 address 0.0.0.0
!
crypto isakmp invalid-spi-recovery
!
crypto ipsec transform-set THEVPN esp-des esp-md5-hmac
 mode tunnel
!
! (This router's "HUB" public IP)
crypto map VPN1 1 ipsec-isakmp
 set peer 172.16.25.2
 set transform-set THEVPN 
 set pfs group2
 match address 110
!
interface Tunnel0
 description TO HQ
 ip address 10.0.0.2 255.255.255.0
 no ip redirects
 ip nhrp authentication SeCrEtKeY
 ! (This will be the Tunnel's IP and WAN's
 ! IP on your HUB router)
 ip nhrp map 10.0.0.1 172.16.25.2
 ip nhrp map multicast 172.16.25.2
 ip nhrp network-id 1
 ip nhrp holdtime 300
 ip nhrp nhs 10.0.0.1
 ip nhrp cache non-authoritative
 tunnel source FastEthernet0/1
 tunnel mode gre multipoint
 crypto map VPN1
!
!
interface GigabitEthernet0/0
 description LAN
 ip address 10.2.1.1 255.255.255.0
 no ip route-cache
 ip access-group 115 in
 ip nat inside
 duplex auto
 speed auto
 no cdp enable
!
interface GigabitEthernet0/1
 description WAN
 ip address 172.16.86.2 255.255.255.248
 ip nbar protocol-discovery
 ip nat outside
 ip virtual-reassembly in
 duplex auto
 speed auto
 no cdp enable
 ! (This is what creates the IPSec Tunnel)
 crypto map VPN1
!
ip forward-protocol nd
!
ip nat inside source route-map PRI-WAN int GigabitE 0/1 over
ip route profile
ip route 0.0.0.0 0.0.0.0 172.16.86.1
! (This is where you will route your traffic to the HUB to
! be processed or forwarded to other sites.)
ip route 10.0.0.0 255.0.0.0 10.0.0.1
!
route-map PRI-WAN permit 10
 match ip address 100
 match interface GigabitEthernet0/1
!
access-list 100 permit ip 10.1.1.0 0.0.0.255 any
! (You will need the first address to be your local WAN
! IP Address, the second address is the HUB router)
access-list 110 permit gre host 172.16.86.2 host 172.16.25.2
access-list 115 permit ip any any
access-list 115 deny ip any any
!
end


The only Major Variable at play in this are your

  •  ISAKMP KEY: 123456789
    • You will really want to change this before going into production
  • PEERS
    • These will need to be updated to the corresponding routers for production
  • IP NHRP MAP
    • This will need to be updated to your HUB router’s WAN IP and TUNNEL IP
  • ACCESS-LIST 110 PERMIT GRE HOST W.X.Y.Z host W.X.Y.Z
    • This will need to be updated to your router’s Hub and Spoke Addresses.


Any questions, comments?  Post them!


black-nexus-5-back-on-play-store[1]

Google Nexus 5

​Pros:

So far the battery life has been great (very important to me). The reception has been great, easily better than the iPhone. Great forward and self-camera, user-interface is wonderful, really good screen resolution, picture, and brightness.

Cons:

Not available on Verizon (not the phones fault). No expandable memory or replaceable battery. Many people complain that if the phone is not RIGHT UP TO your mouth, it is difficult to understand what you are saying.

Summary:

I previously had the Nexus 4, so when the Nexus 5 came out, it was a must have. Full sized screen, great sound and picture quality. Out of the box, it was one of the best looking phones I had ever seen. It even feels like it is of a sound build so I do not always feel like I am going to accidentally crush it.

Because this is a Nexus phone, it is one of Google’s flagship models. As with all the Nexus phones, Google works to pack it with all the latest and greatest features and abilities that are available to the general market.

Bottom Line:

The price is very reasonable, it has all the same features of other phones, and it is another one of Android’s iPhone Killers! As much as I dislike using iPhone as the gold standard, it is the phone which all other phones are compared against. That said, I would take this over an iPhone any day of the week.

en-US-Office-Mod-E-Business-Is-Better-Office16-356-desktop[1]

Microsoft Office 365

​Pros:

No more dealing with overly complex licensing in the form of CALs, Install Media, and Versions. No more worrying about backups, redundancy, multiple points of failure, or Spam Walls. No need to setup MS Exchange (Front End/Back End), SharePoint, Lync, Licenses Servers, or File Shares… It’s all hosted – Just setup the account, enter the billing info and GO!

Cons:

Every now and then, you find these surprise “nuggets” of non-support, system limitations, and “I was not expecting that”.

Summary:

For a flat monthly rate, Microsoft provides you licensing for Office Pro Plus (Word, Excel, PowerPoint, Publisher, Access, and Outlook), an email host, SharePoint for public and private sites, Lync for messaging or Web Conferencing, and file storage. All of these services are than hosted by Microsoft in their cutting edge data facility.

You no longer have to back up your data, create redundancies, or failovers. The only services you have to host your self are going to be Active Directory (if you use it) and any application servers beyond the standard suite.

Bottom Line:

Realistically, for all the services Microsoft is providing you for this flat monthly rate, you are getting a ridiculously great deal. It is a phenomenal cost cutting measure when you think of how many hours of troubleshooting you can remove from Exchange and SharePoint, never having to guestimate on CALs (I hate CALs), and not playing games with SSL Certs, DNS, auto discovery, and firewalls.

I would advise anyone looking to dive into this that first they take a long hard look inside and make sure they have what it takes when it comes to troubleshooting some of Microsoft eccentricities’.

What is the Cloud?

Lets take a looks at three things to get a better understanding: Why is it called the cloud? What can the cloud do for me? Is it safe?

​​​​The cloud get its name from “Network Diagrams”, those are the blueprints that IT Persons (geeks, programmers, data engineers, etc.) use to plan and build networks. Since the beginning of network diagrams, a cloud (see below) has been used to represent all things beyond their network, often times, this was a metaphor for the internet itself.

Because things stored in the cloud are stored to the internet, often beyond the local network, and at the control of an outside organization, the term Cloud was coined.

The power of the cloud is easily harnessed by those who embrace what it stands for; specialization by outsourcing, subscription based services (this is to say you are leasing something instead of buying it), and being willing to give up local control in order to increase accessibility externally.

The cloud allows you to take your data, software, and aspects of your network out of your current physical location and move it into any number of companies data-centers. The advantage to data centers is because of their buying power, they are able to guarantee high level of accessibility with things like redundant power supplies, regular backups of data, and ultra-fast (redundant) internet connections. Additionally, because of their buying power, they can by hard drives, servers, and infrastructure at a higher discount rate than an individual organization.

All of this is well and good but is my data REALLY safe? There are a plethora of organizations out there that are willing to bring you to the cloud, but not all of them are created equally. The vast majority of them are strong companies looking to give you the best experience possible, but you need to judge each organization by its merits. Look for their professional certifications, accreditations, what they can guarantee and what they are bonded and insured for.

When looking for an organization to bring your data too, Google them, see what comes up. Look for an objective company that focuses on migrating your data to the cloud (www.tcomtdm.com), they will be able to show you many of the advantages and disadvantages of working with different cloud providers. They will be able to make recommendations on what vendors they have had good success with in the past.